NGINX – How to setup as a reverse proxy
01 May 2017 5 minute read editBefore I show you the installation and configuration, if you don’t know already what a reverse proxy, or on that matter a proxy, then read the next section. If you just want to get onto the configuration, you can skip this section. I found that there are many definitions out there on what a proxy is, but many were extremely abstract, making it difficult to contextualise. For this reason, I have attempted to keep it simple, whilst covering the core.
What is a proxy?
A proxy, in its simplest definition is just something acting on behalf of something else. For instance, a doctor can be thought of as a proxy. A doctor may make a healthcare decision on behalf of a patient (healthcare proxy). A computer acting on behalf of another computer is also a proxy.
The behaviour that a proxy performs is entirely dependent on its application, but as my focus is nginx, I will limit this post to web proxies (here is a full list of proxy servers).
What is a forward proxy?
If you were in an office or in a public library, there is a good chance that you would not be going straight out on the internet, but rather, you would go through another dedicated machine before making the hop onto the internet.
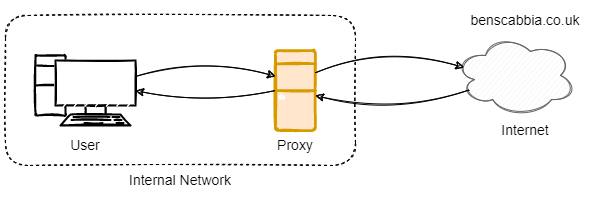
This is what is known as a forward proxy. A forward proxy can perform a number of actions, such as log everything that a user does, block certain requests to certain websites (e.g. block facebook during work hours) or throttle user bandwidth. An important distinction here is that the client is aware of the proxy, as they must connect to the proxy to access the internet.
What is a reverse proxy?
A reverse proxy is fairly similar to a forward proxy, you still go through a dedicated machine to reach your requested destination, but rather than the proxy acting on behalf of the clients, it is now acting on behalf of servers:
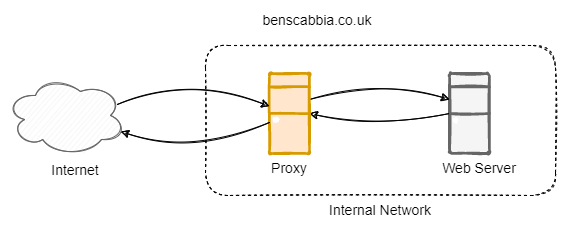
The important distinction to make here is that the client does not have any knowledge of the proxy, in fact, it appears that you are dealing directly with the web server.
A common use for a reverse proxy is to enable a single IP address to host many websites. The users request is checked by the proxy and then it passes the request to the correct location.
We will now look at Nginx which is an open-source web and proxy server. We will configure ours as a reverse proxy and hopefully my explanation above will make much more sense once we dive into the configuration.
Nginx Installation (Ubuntu)
Remember to configure your router to redirecting all traffic on port 80 to you server running Nginx.
sudo apt-get update
sudo apt-get install nginx
The installation is now complete. In the next section we will configure it:
cd /etc/nginx/sites-enabled
sudo nano default

# set configuration to like below
server {
    listen 80;
    server_name www.benjaminscabbia.co.uk benjaminscabbia.com;
    location / {
        proxy_pass 192.168.1.1;
        proxy_set_header Host $host;
        proxy_set_header X-Real-IP $remote_addr;
        proxy_set_header X-Forwarded-For $remote_addr;
    }
}
That’s it for our first domain. In this case, we specify the port we want to listen on, the domains that we wish to listen for and the we specify the location of the server (proxy_pass). As my server makes use of virtualhosts, I also must specify some additional information such as the $host address. The $remote_addr is used more for logging than anything else.
For your next domain, you can simply copy and paste the configuration above changing the proxy_pass and server_name e.g.
server {
    listen 80;
    server_name www.anotherDomain.com anotherdomain.com;
    location / {
        proxy_pass 192.168.1.3:9810; # can specify the port
        proxy_set_header Host $host;
        proxy_set_header X-Real-IP $remote_addr;
        proxy_set_header X-Forwarded-For $remote_addr;
    }
}
Once you have configured your reverse-proxy, we must reload the configuration. Below is a set of useful commands to help you with debugging and reloading:
sudo service nginx status # status of service
sudo service nginx reload # reload configuration (without downtime). Can do: 'status', 'stop', 'start', 'restart'
sudo nginx -t # checks configuration is valid
Note if you experience any issues, you can look at logs in: /var/log/nginx/