IdentityServer4 Essentials
17 Mar 2019 17 minute read editI am currently working on a personal project and have decided - as a learning exercise - to set up and configure IdentityServer4. This guide is what I wished I had before starting. It will cover some of the basics surrounding OAuth and Open ID Connect before diving into IdentityServer4.
Layout of the landscape
Probably the most confusing aspect of IdentityServer4 (IS4) is the terminology. Here is a high-level overview of the main terms:
- Authentication = are you really who you say you are? Sounds obvious, but not to be confused with authorization…
- Authorization = what should you be allowed to do? Can you read/write or Read-only?
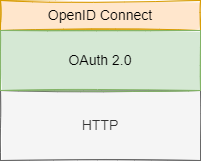
- OAuth (1.0 / 2.0) = a protocol enabling you to sign in using your existing account for another service. OAuth has a number of “flows” (ways to log in and communicate with the app asking for permissions). The end result is giving the requesting application a set of claims (a simple key/value list of attributes). Standard claims are userid, email, and name. It can include things like birthday, customer id, or anything else. OAuth is primarily used for authorization - it assumes the user has already been authenticated elsewhere.
- OpenID = another standard protocol for authenticating to external apps from a single account but focused only on authentication. This is the key difference with OAuth, where it was concerned on authorization, but it lacked the ability to authenticate users (although it didn’t stop companies writing their own authentification layer for OAuth).
- OpenID Connect (OIDC) = modern protocol that merges the latest OAuth and OpenID into a single system that lets an app know who you are and also optionally ask for authorization/permissions data if available. This is a direct extension over OAuth adding an additional layer to provide a mechanism to authenticate.
- OAuth and OpenID Connect flows: view here.
- OAuth and OpenID Connect flows: view here.
IdentityServer4 (IS4)
What is it?
- IS4 is an OpenID Connect and OAuth 2.0 framework for ASP.NET Core 2.
- IS4 is an identity provider that issues tokens to clients.
IS4 Terminology
- User - A human that is using a registered client to access a resource
- Client - A client is a piece of software requesting a token from IdentityServer e.g. Mobile app, web app, SPAs etc. They request for:
- Identity Token - for authenticating the user
- identity token is the outcome of the authentication process
- contains an identifier for the user (a sub/subject claim)
- also contains info on how and when the user authenticated, but it can contain additional identity data
- Access Token - for accessing an API resource (authorize access to data)
- clients request access tokens and forward them to APIs
- contain information about the client and (optionally) the user
- IdentityServer wants to know which clients can request tokens - its a whitelist.
- Identity Token - for authenticating the user
-
Grant Types - how a client wants to interact with IS to retrieve an access token. OpenID Connect and OAuth 2 defines a number of grant types:
- Implicit
- Authorization Code
- Hybrid
- Resource Owner Password
- Client Credentials
-
etc
These are also referred to as flows, and a client would tell the IdentityProvider which flow it’s using by setting the response type. A response type is what the client sends as part of OIDC i.e.
-
a client setting response type to:
id_token- implicit flowcode- authorization code flowid_token code- hybrid flow
More examples here. Each flow has its own advantages/disadvantages and drastically change how the user interacts with your app.
-
-
Scopes - the access privileges are being requested by the Client. There are a number of built-in ones including:
- OpenID - I said earlier that OpenID is an extension on OAuth. The magic is here, by using this scope, we extend OAuth to support Authentication
- Profile, email, address etc - your standard OAuth scopes, what should the client have access to?
-
You can create your own scopes, for example, here are some custom scopes that github provides:
IdentityServer4 Internals
As an example, let’s imagine we have a Mobile app that requires authentication. We want a simple login page with username and password textbox and a login button, which then will enable the app to authenticate the user and authorize the client to access an API to request some data. Let’s start with the client:
Clients
internal class Clients {
    public static IEnumerable<Client> Get() {
        return new List<Client> {
            new Client {
                ClientId = "MobileAppClient",
                ClientName = "Example Client Application",
                AllowedGrantTypes = GrantTypes.ResourceOwnerPassword,
                ClientSecrets =
                {
                    new Secret("superSecretPassword".Sha256())
                },
                AllowedScopes = {"customAPI.read"}
            }
        };
    }
}
Above we define a client, MobileAppClient with the ResourceOwnerPassword OAuth grant type.
This particular flow enables our app (the client) to authenticate on behalf of our user (i.e. the user gives his username and password, and the client will then pass those details on and request a token). This particular client has a scoped access to read-only, so they can only read from our API.
Resources (they were called scopes in IS3)
Next, we define what resources/scopes we want to protect with IdentityServer. In other words, what resources is the client allowed to use? e.g.
- Identity data - identity information about a user, also known as claims - name, email address etc
- APIs - Resources of an API represents functionality available to a client
- two types of resources: Identity and API
Every resource has a unique name, clients use this name to specify the resource they want access to.
internal class Resources {
    public static IEnumerable<IdentityResource> GetIdentityResources() {
        return new List<IdentityResource> {
            new IdentityResources.OpenId(),
            new IdentityResource {
                Name = "role",
                UserClaims = new List<string> {"role"}
            }
        };
    }

    public static IEnumerable<ApiResource> GetApiResources() {
        return new List<ApiResource> {
            new ApiResource {
                Name = "customAPI",
                DisplayName = "Custom API",
                Description = "Custom API Access",
                UserClaims = new List<string> {"role"}, //custom claim
                ApiSecrets = new List<Secret> {new Secret("scopeSecret".Sha256())},
                Scopes = new List<Scope> {
                    new Scope("customAPI.read"),
                    new Scope("customAPI.write")
                }
            }
        };
    }
}
We set up two resources: Identity and API.
IdentityResources are things like user ID, name and email address of the user. We can assign it a list of scopes to this, and the IdentityResource will then include these scopes. The minimum implementation is to assign a unique ID to users, also called subject ID, which we do by exposing the OpenID scope. We could also assign Email and Profile scope. For the sake of learning, we are also defining a custom scope, role which returns the role claims for the authenticated user. The OpenID scope returns a Subject claim, see here.
To allow a client to access our API we create an API resource. We are effectively modelling the API that we wish to protect. To enable a client to get an access token to query an API, the client must select a scope. The resource for the API has two scopes that a client is allowed to access: customAPI.read and customAPI.write. In the above example, we provide clients with two scopes.
Claims
Claims are specific attributes about a user. They are key/value pairs containing info about a user, as well as meta-description about OIDC service.
Wiki defines it as “A claim is a statement that one subject, such as a person or organization, makes about itself or another subject. For example, the statement can be about a name, group, buying preference, ethnicity, privilege, association or capability.”.
To provide an example, in your application your user may have a name, email and company name - these are your claims. If a client requests access to the Admin controller of your Web API, this would be a scope. Note, that a claim is defined as part of the resource.
Users
IS4 supports the ASP.NET Identity so we can add something like below:
internal class Users {
    public static List<TestUser> Get() {
        return new List<TestUser> {
            new TestUser {
                SubjectId = "1",
                Username = "ben",
                Password = "password",
                Claims = new List<Claim> {
                    new Claim(JwtClaimTypes.Email, "ben@email.com"),
                    new Claim(JwtClaimTypes.Role, "admin")
                }
            }
        };
    }
}
This will enable the user, ben, to authenticate and request a token. To persist this, in IS4 we would then need to use the IResourceOwnerPasswordValidator to authenticate the user, and then use IProfileService to get the claims.
Tokens
Now that we know the basics about what a user, a client and resources (including scopes and claims) we can now discuss tokens. There are three types of tokens in OIDC: id_token, access_token and refresh_token.
id_token
Id_Token is used only in an implicit or Hybrid flow which is outside the scope of this post. But essentially, it stores information about the user (encoded within the token aka claims). Many OIDC implementers will use JSON Web Token (JWT) as the format for this token - but this is not part of the OIDC spec. JWT is also commonly used for access_token and refresh_token.
access_token
Access_token are used as bearer tokens. A bearer token means that the bearer can access the authorized resource without further authentication (identification). These tokens must be protected as if someone got access to your token they can do anything (within the scope enabled). By looking at your claims, they could figure out quickly how much they can do. The claims store information about the client and the user - this is how the APIs authorize (not to be confused with authenticating) access to their data. Access_tokens generally have a short lifespan. For clients that require a longer life-span, they would typically use long-lived refresh tokens to refresh their access_token.
refresh_tokens
Refresh_tokens are used to obtain new access_tokens. Typically, refresh tokens are long-lived, whereas access_tokens are short lived. Here is the flow:
- User requests access and refresh token
- once access token expired, use the refresh token to get the new token
- repeat until refresh token expires
- when refresh token expires, the user will need to re-authenticate
This is extremely useful for a scenario where an admin person wants to revoke access to a user. They can revoke the subscription token and block their account so when the user tries to refresh and they need to reauthenticate, which they won’t be able to.
Refresh tokens can be enabled in IS4 by specifying if the client enables offline access i.e. to disable:
new Client
{
    ...
    // Set to false to disable refresh Tokens
    OfflineAccess = false,
    ...

}
It can be confusing sometimes to distinguish between the different token types. Here’s a quick reference:
- ID tokens carry identity information encoded in the token itself, which must be a JWT
- Access tokens are used to gain access to resources by using them as bearer tokens
- Refresh tokens exist solely to get more access tokens
There we have it, a short introduction on how things are set out. Here are a bunch of resources that I would highly recommend you go through before doing anything with IS4 as it will save you a lot of time in the long run.
Where to go next?
Must-sees
- OAuth 2.0 and OpenID Connect (in plain English)
- Go through official docs, but if you want to get hands-on, go here
- IS4 Samples, download and try
- IS4 Templates
Optional